
|
|
пре 3 година | |
|---|---|---|
| .. | ||
| lv_config | пре 4 година | |
| wasm-apps | пре 3 година | |
| wasm-runtime-wgl | пре 3 година | |
| README.md | пре 4 година | |
| build.sh | пре 5 година | |
| wamr_config_gui.cmake | пре 6 година | |
README.md
"gui" sample introduction
This sample demonstrates that a graphic user interface application in WebAssembly programming with WAMR graphic library(WGL) which is part of WAMR app-framework.
Compared with the littlevgl sample, WGL compiles LittlevGL source code into the WAMR runtime and defines a set of wrapper API's for exporting to Webassembly application.
Below picture shows the WASM application is running on an STM board with an LCD touch panel.
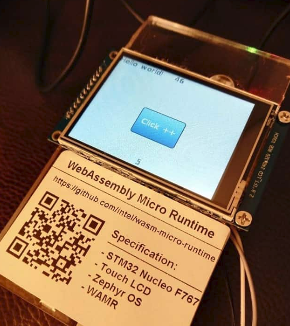
When user clicks the blue button, the WASM application increases the counter, and the latest counter value is displayed on the top banner of the touch panel. The number on top will plus one each second, and the number on the bottom will plus one when clicked.
Test on Linux
Install required SDK and libraries
32 bit SDL(simple directmedia layer) (Note: only necessary when
WAMR_BUILD_TARGETis set toX86_32when building WAMR runtime) Use apt-get:sudo apt-get install libsdl2-dev:i386Or download source from www.libsdl.org:
./configure C_FLAGS=-m32 CXX_FLAGS=-m32 LD_FLAGS=-m32
make
sudo make install
64 bit SDL(simple directmedia layer) (Note: only necessary when
WAMR_BUILD_TARGETis set toX86_64when building WAMR runtime) Use apt-get:sudo apt-get install libsdl2-dev
Or download source from www.libsdl.org:
  ./configure
  make
  sudo make install
Build and Run
Build
./build.shAll binaries are in "out", which contains "host_tool", "ui_decrease.wasm", "ui_increase.wasm" and "wasm_runtime_wgl".
Run WASM VM Linux applicaton & install WASM APP First start wasm_runtime_wgl in server mode.
./wasm_runtime_wgl -sThen install wasm APP by using host tool.
./host_tool -i inc -f ui_increase.wasm
# or
./host_tool -i dec -f ui_decrease.wasm
Test on Zephyr
We can use a STM32 NUCLEO_F767ZI board with ILI9341 display and XPT2046 touch screen to run the test. Then use host_tool to remotely install wasm app into STM32.
Build WASM VM into Zephyr system a. clone zephyr source code Refer to Zephyr getting started.
west init zephyrproject
cd zephyrproject/zephyr
git checkout zephyr-v2.3.0
cd ..
west update
b. copy samples
  cd zephyr/samples
  cp -a <wamr_root>/samples/gui/wasm-runtime-wgl wasm-runtime-wgl
  cd wasm-runtime-wgl/zephyr_build
c. create a link to wamr root dir
ln -s <wamr_root> wamr
d. build source code
  mkdir build && cd build
  source ../../../../zephyr-env.sh
  cmake -GNinja -DBOARD=nucleo_f767zi ..
  ninja flash
Hardware Connections
+-------------------+-+------------------+
|NUCLEO-F767ZI       | ILI9341  Display  |
+-------------------+-+------------------+
| CN7.10             |         CLK       |
+-------------------+-+------------------+
| CN7.12             |         MISO      |
+-------------------+-+------------------+
| CN7.14             |         MOSI      |
+-------------------+-+------------------+
| CN11.1             | CS1 for ILI9341   |
+-------------------+-+------------------+
| CN11.2             |         D/C       |
+-------------------+-+------------------+
| CN11.3             |         RESET     |
+-------------------+-+------------------+
| CN9.25             |    PEN interrupt  |
+-------------------+-+------------------+
| CN9.27             |  CS2 for XPT2046  |
+-------------------+-+------------------+
| CN10.14            |    PC UART RX     |
+-------------------+-+------------------+
| CN11.16            |    PC UART RX     |
+-------------------+-+------------------+
Install WASM application to Zephyr using host_tool First, connect PC and STM32 with UART. Then install to use host_tool.
sudo ./host_tool -D /dev/ttyUSBXXX -i inc -f ui_increase.wasm
# /dev/ttyUSBXXX is the UART device, e.g. /dev/ttyUSB0
Install AOT version WASM application
wamrc --target=thumbv7 --target-abi=eabi --cpu=cortex-m7 -o ui_app.aot ui_increase.wasm
./host_tool -D /dev/ttyUSBXXX -i inc -f ui_app.aot
The graphic user interface demo photo:
